Getting Started
Let’s walk through core API concepts as we tackle some everyday use cases.
Overview
Most applications will use an existing wrapper library in the language of your choice, but it’s important to familiarize yourself with the underlying API HTTP methods first.
There’s no easier way to kick the tires than through cURL.
Hello World
Let’s start by testing our setup. Open up a command prompt and enter the
following command (without the $):
$ curl https://api.github.com/zen

Keep it logically awesome.
The response will be a random selection from our design philosophies.
Next, let’s GET Chris Wanstrath’s GitHub profile:
# GET /users/defunkt
$ curl https://api.github.com/users/defunkt

{
  "login": "defunkt",
  "id": 2,
  "url": "https://api.github.com/users/defunkt",
  "html_url": "https://github.com/defunkt",
  ...
}
Mmmmm, tastes like JSON. Let’s add the -i flag to include headers:
$ curl -i https://api.github.com/users/defunkt

HTTP/1.1 200 OK
Server: GitHub.com
Date: Sun, 11 Nov 2012 18:43:28 GMT
Content-Type: application/json; charset=utf-8
Connection: keep-alive
Status: 200 OK
ETag: "bfd85cbf23ac0b0c8a29bee02e7117c6"
X-RateLimit-Limit: 60
X-RateLimit-Remaining: 57
X-RateLimit-Reset: 1352660008
X-GitHub-Media-Type: github.v3
Vary: Accept
Cache-Control: public, max-age=60, s-maxage=60
X-Content-Type-Options: nosniff
Content-Length: 692
Last-Modified: Tue, 30 Oct 2012 18:58:42 GMT

{
  "login": "defunkt",
  "id": 2,
  "url": "https://api.github.com/users/defunkt",
  "html_url": "https://github.com/defunkt",
  ...
}
There are a few interesting bits in the response headers. As expected, the
Content-Type is application/json.
Any headers beginning with X- are custom headers, and are not included in the
HTTP spec. Let’s take a look at a few of them:
-
X-GitHub-Media-Typehas a value ofgithub.v3. This lets us know the media type for the response. Media types have helped us version our output in API v3. We’ll talk more about that later. - Take note of the
X-RateLimit-LimitandX-RateLimit-Remainingheaders. This pair of headers indicate how many requests a client can make in a rolling time period (typically an hour) and how many of those requests the client has already spent.
Authentication
Unauthenticated clients can make 60 requests per hour. To get more, we’ll need to authenticate. In fact, doing anything interesting with the GitHub API requires authentication.
Basic
The easiest way to authenticate with the GitHub API is by simply using your GitHub username and password via Basic Authentication.
$ curl -i -u <your_username> https://api.github.com/users/defunkt

Enter host password for user '<your_username>':
The -u flag sets the username, and cURL will prompt you for the password. You
can use -u "username:password" to avoid the prompt, but this leaves your
password in shell history and isn’t recommended. When authenticating, you
should see your rate limit bumped to 5,000 requests an hour, as indicated in the
X-RateLimit-Limit header.
In addition to just getting more calls per hour, authentication is the key to reading and writing private information via the API.
Two-factor authentication
If you have two-factor authentication enabled, the API will return a
401 Unauthorized error code for the above request (and every other API request):
$ curl -i -u <your_username> https://api.github.com/users/defunkt

Enter host password for user '<your_username>':

HTTP/1.1 401 Unauthorized
X-GitHub-OTP: required; :2fa-type

{
  "message": "Must specify two-factor authentication OTP code.",
  "documentation_url": "https://developer.github.com/v3/auth#working-with-two-factor-authentication"
}
The easiest way to get around that error is to create an OAuth token and use OAuth authentication instead of Basic Authentication. See the OAuth section below for more information.
Get your own user profile
When properly authenticated, you can take advantage of the permissions associated with your GitHub account. For example, try getting your own user profile:
$ curl -i -u <your_username> https://api.github.com/user

{
  ...
  "plan": {
    "space": 2516582,
    "collaborators": 10,
    "private_repos": 20,
    "name": "medium"
  }
  ...
}
This time, in addition to the same set of public information we
retrieved for @defunkt earlier, you should also see the non-public
information for your user profile. For example, you’ll see a plan object
in the response which gives details about the GitHub plan for the account.
OAuth
While convenient, Basic Authentication isn’t ideal because you shouldn’t give your GitHub username and password to anyone. Applications that need to read or write private information using the API on behalf of another user should use OAuth.
Instead of usernames and passwords, OAuth uses tokens. Tokens provide two big features:
- Revokable access: users can revoke authorization to third party apps at any time
- Limited access: users can review the specific access that a token will provide before authorizing a third party app
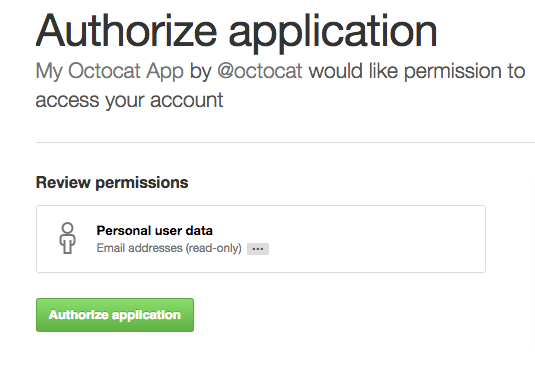
Normally, tokens are created via a web flow. An application sends users to GitHub to log in. GitHub then presents a dialog indicating the name of the app, as well as the level of access the app has once it’s authorized by the user. After a user authorizes access, GitHub redirects the user back to the application:
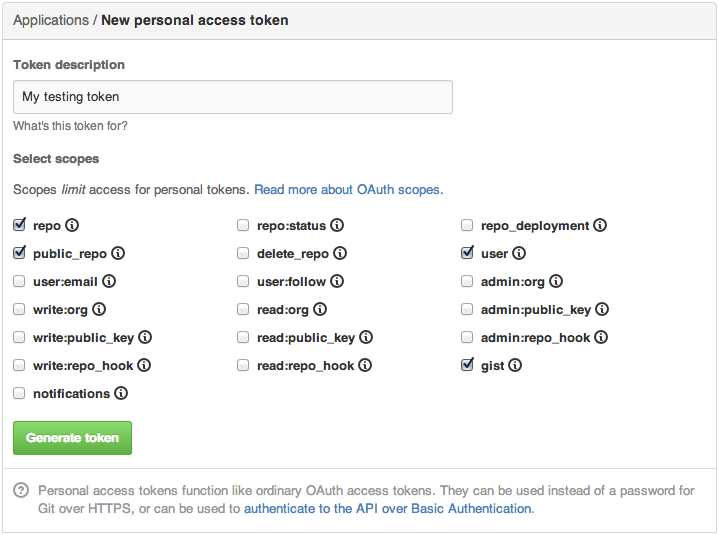
However, you don’t need to set up the entire web flow to begin working with OAuth tokens. An easier way to get a token is to create a personal access token via your Application settings page:
Also, the Authorizations API makes it simple to use Basic Authentication to create an OAuth token. Try pasting and running the following command:
$ curl -i -u <your_username> -d '{"scopes": ["repo", "user"], "note": "getting-started"}' \
    https://api.github.com/authorizations

HTTP/1.1 201 Created
Location: https://api.github.com/authorizations/2
Content-Length: 384

{
  "scopes": [
    "repo",
    "user"
  ],
  "token": "5199831f4dd3b79e7c5b7e0ebe75d67aa66e79d4",
  "updated_at": "2012-11-14T14:04:24Z",
  "url": "https://api.github.com/authorizations/2",
  "app": {
    "url": "https://developer.github.com/v3/oauth/#oauth-authorizations-api",
    "name": "GitHub API"
  },
  "created_at": "2012-11-14T14:04:24Z",
  "note_url": null,
  "id": 2,
  "note": "getting-started"
}
There’s a lot going on in this one little call, so let’s break it down. First,
the -d flag indicates we’re doing a POST, using the
application/x-www-form-urlencoded content type (as opposed to GET). All POST
requests to the GitHub API should be in JSON.
Next, let’s look at the scopes we’re sending over in this call. When creating
a new token, we include an optional array of scopes, or access
levels, that indicate what information this token can access. In this case,
we’re setting up the token with repo access, which grants access to read and
write to public and private repositories, and user scope, which grants read
and write access to public and private user profile data. See
the scopes docs for a full list of
scopes. You should only request scopes that your application actually needs,
in order to not frighten users with potentially invasive actions. The 201
status code tells us that the call was successful, and the JSON returned
contains the details of our new OAuth token.
If you have two-factor authentication enabled, the API will
return the previously described 401 Unauthorized error code
for the above request. You can get around that error by providing a 2FA OTP code
in the X-GitHub-OTP request header:
$ curl -i -u <your_username> -H "X-GitHub-OTP: <your_2fa_OTP_code>" \
    -d '{"scopes": ["repo", "user"], "note": "getting-started"}' \
    https://api.github.com/authorizations
If you enabled 2FA with a mobile application, go ahead and get an OTP code from your one-time password application on your phone. If you enabled 2FA with text messages, you’ll receive an SMS with your OTP code after making a request to this endpoint.
Now, we can use the forty character token instead of a username and password
in the rest of our examples. Let’s grab our own user info again, using OAuth this time:
$ curl -i -H 'Authorization: token 5199831f4dd3b79e7c5b7e0ebe75d67aa66e79d4' \
    https://api.github.com/user
Treat OAuth tokens like passwords! Don’t share them with other users or store them in insecure places. The tokens in these examples are fake and the names have been changed to protect the innocent.
Now that we’ve got the hang of making authenticated calls, let’s move along to the Repositories API.
Repositories
Almost any meaningful use of the GitHub API will involve some level of Repository
information. We can GET repository details in the same way we fetched user
details earlier:
$ curl -i https://api.github.com/repos/twbs/bootstrap
In the same way, we can view repositories for the authenticated user:
$ curl -i -H 'Authorization: token 5199831f4dd3b79e7c5b7e0ebe75d67aa66e79d4' \
    https://api.github.com/user/repos
Or, we can list repositories for another user:
$ curl -i https://api.github.com/users/technoweenie/repos
Or, we can list repositories for an organization:
$ curl -i https://api.github.com/orgs/mozilla/repos
The information returned from these calls will depend on how we authenticate:
- Using Basic Authentication, the response includes all repositories the the user has access to see on github.com.
- Using OAuth, private repositories are only returned if the OAuth token
contains the
reposcope.
As the docs indicate, these methods take a type parameter that
can filter the repositories returned based on what type of access the user has
for the repository. In this way, we can fetch only directly-owned repositories,
organization repositories, or repositories the user collaborates on via a team.
$ curl -i "https://api.github.com/users/technoweenie/repos?type=owner"
In this example, we grab only those repositories that technoweenie owns, not the ones on which he collaborates. Note the quoted URL above. Depending on your shell setup, cURL sometimes requires a quoted URL or else it ignores the query string.
Create a repository
Fetching information for existing repositories is a common use case, but the
GitHub API supports creating new repositories as well. To create a repository,
we need to POST some JSON containing the details and configuration options.
$ curl -i -H 'Authorization: token 5199831f4dd3b79e7c5b7e0ebe75d67aa66e79d4' \
    -d '{ \
        "name": "blog", \
        "auto_init": true, \
        "private": true, \
        "gitignore_template": "nanoc" \
      }' \
    https://api.github.com/user/repos
In this minimal example, we create a new repository for our blog (to be served on GitHub Pages, perhaps). Though the blog will be public, we’ve made the repository private. In this single step, we’ll also initialize it with a README and a nanoc-flavored .gitignore template.
The resulting repository will be found at https://github.com/<your_username>/blog.
To create a repository under an organization for which you’re
an owner, just change the API method from /user/repos to /orgs/<org_name>/repos.
Next, let’s fetch our newly created repository:
$ curl -i https://api.github.com/repos/pengwynn/blog

HTTP/1.1 404 Not Found

{
    "message": "Not Found"
}
Oh noes! Where did it go? Since we created the repository as private, we need
to authenticate in order to see it. If you’re a grizzled HTTP user, you might
expect a 403 instead. Since we don’t want to leak information about private
repositories, the GitHub API returns a 404 in this case, as if to say “we can
neither confirm nor deny the existence of this repository.”
Issues
The UI for Issues on GitHub aims to provide ‘just enough’ workflow while staying out of your way. With the GitHub Issues API, you can pull data out or create issues from other tools to create a workflow that works for your team.
Just like github.com, the API provides a few methods to view issues for the
authenticated user. To see all your issues, call GET /issues:
$ curl -i -H 'Authorization: token 5199831f4dd3b79e7c5b7e0ebe75d67aa66e79d4' \
    https://api.github.com/issues
To get only the issues under one of your GitHub organizations, call GET
/orgs/<org>/issues:
$ curl -i -H 'Authorization: token 5199831f4dd3b79e7c5b7e0ebe75d67aa66e79d4' \
    https://api.github.com/orgs/rails/issues
We can also get all the issues under a single repository:
$ curl -i https://api.github.com/repos/rails/rails/issues
Pagination
A project the size of Rails has thousands of issues. We’ll need to paginate, making multiple API calls to get the data. Let’s repeat that last call, this time taking note of the response headers:
$ curl -i https://api.github.com/repos/rails/rails/issues

HTTP/1.1 200 OK

Link: <https://api.github.com/repos/rails/rails/issues?page=2>; rel="next",
<https://api.github.com/repos/rails/rails/issues?page=14>; rel="last"
The Link header provides a way for a response to link to
external resources, in this case additional pages of data. Since our call found
more than thirty issues (the default page size), the API tells us where we can
find the next page and the last page of results.
Creating an issue
Now that we’ve seen how to paginate lists of issues, let’s create an issue from the API.
To create an issue, we need to be authenticated, so we’ll pass an
OAuth token in the header. Also, we’ll pass the title, body, and labels in the JSON
body to the /issues path underneath the repository in which we want to create
the issue:
$ curl -i -H 'Authorization: token 5199831f4dd3b79e7c5b7e0ebe75d67aa66e79d4' \
    -d '{ \
         "title": "New logo", \
         "body": "We should have one", \
         "labels": ["design"] \
       }' \
    https://api.github.com/repos/pengwynn/api-sandbox/issues

HTTP/1.1 201 Created
Location: https://api.github.com/repos/pengwynn/api-sandbox/issues/17
X-RateLimit-Limit: 5000

{
  "pull_request": {
    "patch_url": null,
    "html_url": null,
    "diff_url": null
  },
  "created_at": "2012-11-14T15:25:33Z",
  "comments": 0,
  "milestone": null,
  "title": "New logo",
  "body": "We should have one",
  "user": {
    "login": "pengwynn",
    "gravatar_id": "7e19cd5486b5d6dc1ef90e671ba52ae0",
    "avatar_url": "https://secure.gravatar.com/avatar/7e19cd5486b5d6dc1ef90e671ba52ae0?d=https://a248.e.akamai.net/assets.github.com%2Fimages%2Fgravatars%2Fgravatar-user-420.png",
    "id": 865,
    "url": "https://api.github.com/users/pengwynn"
  },
  "closed_at": null,
  "updated_at": "2012-11-14T15:25:33Z",
  "number": 17,
  "closed_by": null,
  "html_url": "https://github.com/pengwynn/api-sandbox/issues/17",
  "labels": [
    {
      "color": "ededed",
      "name": "design",
      "url": "https://api.github.com/repos/pengwynn/api-sandbox/labels/design"
    }
  ],
  "id": 8356941,
  "assignee": null,
  "state": "open",
  "url": "https://api.github.com/repos/pengwynn/api-sandbox/issues/17"
}
The response gives us a couple of pointers to the newly created issue, both in
the Location response header and the url field of the JSON response.
Conditional requests
A big part of being a good API citizen is respecting rate limits by caching information that hasn’t changed. The API supports conditional requests and helps you do the right thing. Consider the first call we made to get defunkt’s profile:
$ curl -i https://api.github.com/users/defunkt

HTTP/1.1 200 OK
ETag: "bfd85cbf23ac0b0c8a29bee02e7117c6"
In addition to the JSON body, take note of the HTTP status code of 200 and
the ETag header.
The ETag is a fingerprint of the response. If we pass that on subsequent calls,
we can tell the API to give us the resource again, only if it has changed:
$ curl -i -H 'If-None-Match: "bfd85cbf23ac0b0c8a29bee02e7117c6"' \
    https://api.github.com/users/defunkt

HTTP/1.1 304 Not Modified
The 304 status indicates that the resource hasn’t changed since the last time
we asked for it and the response will contain no body. As a bonus, 304
responses don’t count against your rate limit.
Woot! Now you know the basics of the GitHub API!
- Basic & OAuth authentication
- Fetching and creating repositories and issues
- Conditional requests
Keep learning with the next API guide Basics of Authentication!
